Thursday, March 31, 2011

My Favorite Things - Episode 2

So, I did a "My Favorite Things - Episode 1" forever ago and have not done one since. Considering I called it an "episode", it only seems logical that I must share more favorites!
Today, I share with you my absolute favorites, ever!


My Husband and my dog. Aren't they handsome?

I'm obsessed with my dog. I have about 400 photos of him on my phone (most of them are him sleeping in a funny position). It's a little ridiculous but, just look at him! He's too cute.
Oh, and my husband isn't too bad either ;-)

Wednesday, March 30, 2011

Inspired

I love thegloss.com. I don't know if it's considered a blog, a zine or whatever but it often makes me laugh and sometimes it makes me think. Like today, when I read one of the articles I Regret Everything. Now, I'm not really a believer in regrets but I can't say that I don't have any. However, I'm not getting into that right now. The reason I even bring this up is because of a line of quoted text at the very end of the article:


The writer Anna Quindlen once said, “They say it’s never too late to become what you might have been. But it’s never too early, either.”


I guess the challenge of that quote for me is trying to figure out what it is that I 'may have been' or what I could be. I really have no idea. I realize that I have potential but, for what?

That's the million dollar question, my friends.

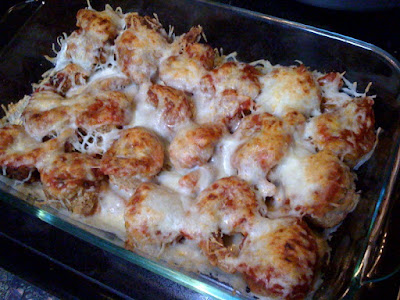
Shrimp Parmesan

Growing up, one of my favorite meals was "Pizza Chicken" (aka chicken parmesan). My parents were brilliant relating it to pizza so that my brother and I would scarf it down. And we did.
I occasionally make Chicken Parm for me and the hubs but tonight I switched it up and made SHRIMP Parmesan. Makes it feel a little more special (also, I didn't have any chicken soooo...)


Ingredients:

1 cup flour
1 - 2 tsp. seasoned salt
1 1/2 cup breadcrumbs (italian seasoned)
1 lb raw shrimp. cleaned, peeled, deveined and butterflied
2 eggs beaten
enough oil to cover the frying pan
spaghetti sauce
shredded mozzerella cheese

Directions:

- Combine flour and seasoned salt in a large ziploc bag
- Put shrimp in bag and shake until well coated, remove from bag
- Add the breadcrumbs to the bag of flour (and any other seasonings you might like. ex- grated parmesan)
- Coat the (now flour covered) shrimp in the egg and drop into the bag. Shake to coat.
- Fry the shrimp in just enough oil to cover the pan you're using (make sure the oil is good and hot before you put your shrimp in otherwise they'll get soggy instead of crispy). Fry for about 1 minute on each side so that the outside gets crispy and browned. Remove from pan and place on a paper towel to get off excess oil.
- Put a couple of tablespoons of pasta sauce in the bottom of a baking dish and spread it around to lightly coat the bottom.
- Place your shrimp in a single layer in prepared pan/dish/whatever. Then spoon some pasta sauce over the shrimp. Don't over do it. Then sprinkle with cheese (as liberally as you'd like).
- Put in your preheated oven (to broil) for about 5-7 minutes until the cheese is melted and the shrimp are cooked through. I like it when the cheese is browned a bit on the top but be careful not to overcook them!


Enjoy with pasta, garlic bread and some wine! Bon Appetit!

Tuesday, March 29, 2011

It's aliiiive!

So last Sunday I bought little grow-kits for Cilantro and Basil in the dollar section at Target. I love the dollar section, I always find the coolest stuff in there.
Anyway, when I got home, I immediately planted the seeds, placed them on the window sill in the kitchen, and started tending to my new little pots of dirt. I don't have a green thumb. It's a wonder that I can keep myself, my husband and my dog alive. Every plant that I've ever had, no matter how vigilant I am, dies. Let's just say that when it comes to this particular project, I was hoping for the best but prepared for the worst.
Yesterday when I was washing a dish, I glanced in my little pots. First the Basil.... nothing. I was not surprised. Then I peeked in the Cilantro pot and....

OMG! LIFE! HOLY COW!

I grabbed the tiny little pot and ran it right over to Uriah to show him my handiwork. He gave  me a "Oh! Good job, hunny" and then I just stared at it for a while in disbelief.

Now if only the Basil would show some improvement, we'd be in business.

Monday, March 28, 2011

Face Lift!

I decided that my little corner of the internet was too 'busy' so I changed it up. There's a strong possibility that I will change it up again soon but, for now, this will do :-)

Coasting

I've been really busy with my Etsy Shop lately. I've been making aprons like a crazy person! I needed a break from that (if only for a day) so, I decided to make something different that didn't require a needle and thread. Coasters! Yes, they're easy but cute and that's a winning combination for me any day! 
I went to the hardware store and bought some 4.25x4.25 inch tiles and some sealent, then I went to target to pick up some pretty paper, then I came home and got cracking! It was nice to make something that didn't require my sewing machine for a change! My only problem is that I only bought 8 tiles. I was thinking that I'd just get some to start and see how it went but now I'm hooked and I really wish that I had bought more tiles! No worries, Home Depot is just across the street :-)

Here are the 2 sets that I did today. I spent a lot of my day cutting up pretty paper in anticipation of heading back to Home Depot to pick up some more tiles. These aren't done YET, they still need a coat or 2 of polyurithane but this is what they'll look like (perhaps they'll be a bit shinier).


set #1 (I'm kind of in love with these but they don't match my home decor)

set #2

I'm sure there will be many many more of these in the not-so-distant future. I'll try to refrain from posting all of them.

Sunday, March 27, 2011

Sloppy Joes

I go to the grocery store towards the beginning of the week so by the end of the week I'm usually like "Hrm... what should I make with this?" It's usually chicken, but this week, it's ground beef! My go-tos for this are meatballs, meat loaf, cheeseburgers and chili. Well, I felt like switching it up a little bit and was trying to decide what to make and then it hit me... Sloppy Joes! If you've never made sloppy joes from scratch, you're missing out. I pretty much always have all of the ingredients on hand so, this makes for the perfect meal in a pinch. Also, they're delicious and remind me of my childhood so that's a double whammy of awesome! I found this recipe on allrecipes.com but I tweeked it quite a bit. You can either follow the link, or you can do it my way, either way, you're in for a treat :-)


What you need:
1 pound lean ground beef
1/2 cup chopped onion
1/2 teaspoon garlic powder
1/2 teaspoon cayenne
1 teaspoon prepared yellow mustard
1/2 cup ketchup
1 tomato chopped
1/2 cap full of vinegar
dash or two of worchestire
1 Tablespoon of BBQ sauce
3 teaspoons brown sugar
salt to taste
ground black pepper to taste


Directions:

In a medium skillet over medium heat, brown the ground beef and onions, drain off liquids.


Stir in the everything else (but save the salt and pepper for later). Reduce heat, and simmer for 30 minutes. Season with salt and pepper (and more of anything else that you think would be good).

Pile it on some buns, maybe add some cheese and enjoy!


Wow... that was hard. Have a glass of wine and give yourself a pat on the back, you deserve it  ;-)

Wednesday, March 23, 2011

Tasty Tilapia Tacos!

Grilled fish tacos and Coronas. Sounds like a fabulous meal that you would eat while on your tropical vacation, doesn't it? OR it could be something that you make for yourself on a beautiful day in your own back yard. A one hour stay-cation. Fabulous!


I got this recipe from my Taste Of Home Magazine but I modified it a bit (recipe called for haddock but Tilapia was on sale and less intimidating). I would probably suggest using less chili powder in the veggie-mixture than I did because the flavor overpowered the fish a little but over all it was nice, cool and refreshing :-)

Ingredients:
1 lb. Tilapia
2 tsp. chili powder (divided)
Juice from 1 lime
1 1/2 tsp. grated rind from lime
2 cups shredded lettuce
1 medium red pepper seeded and chopped
2 medium tomatoes seeded and chopped
1 avacado peeled and chopped
3 Tbs taco sauce
2 ears sweet corn
1 Tbs butter (softened)
salt and pepper
12 Flour tortillas


Spread the butter over the corn, sprinkle with salt and pepper. Grill covered on medium heat for 10-12 minutes or until the corn is tender. Turn occasionally. Set aside to cool.

Once corn is cool enough to handle, remove it from the cob. Combine corn, lettuce, red pepper, tomato, avacado, lime rind, taco sauce, 1 tsp. chili powder and juice from 1/2 of the lime. Stir it up well.

Sprinkle 1 tsp chili powder onto the tilapia (or more chili powder if you feel like it). Grill on a well-oiled grill (to prevent sticking) on medium heat for about 8-10 minutes or until the fish flakes easily with a fork. Turning once. To prevent my fish from falling through the grill, I covered my grill with aluminum foil and then oiled the foil pretty generously to prevent sticking.

Cut fish into pieces and squeeze the juice from the second 1/2 of the lime on top. (I just put it in a bowl and broke it up with a fork but you could be more precise about it if you want)

Assemble tacos however you want. We also had sour cream and shredded cheese. Deeeelicious!

Monday, March 21, 2011

Ironing Board Cover Tutorial

I really don't know how helpful this will be but this project was particularly easy so you probably don't even need a tutorial (I didn't use one) but in case you need a little help, Here you go!

This is what our ironing board looked like:

All gross and nasty because I've been using and abusing it making all of my sewing projects. ALSO the padding was really thin and would create a diamond pattern on anything you were trying to iron. Not fun and really annoying.

Things you will need:
Old Ironing Board Cover
Cotton Fabric (2 1/2 - 3 yards)
Insulated Batting
Yarn/String
Sewing Machine
Mad Skills


STEP ONE:
Remove current skanky ironing board cover

STEP TWO:
Take the padding and trace it onto a large piece of insulated batting. Check the size with your board.
Pretty good. If it's a little big, who cares? Not me. It's just an ironing board.

The batting that I had wasn't long enough so I had get all McGyver on it and sew two pieces together (with out overlapping because that would make indents in the things that you are ironing). I basically zig-zag stitched it together and then zig-zagged it a second time (with smaller stitches) for good measure. You can't even tell it's there under the cover.

STEP 3
Time to make the cover! Take the same piece of old padding and lay it on your fabric. Mark around it with 3 extra inches (this will be what you fold over to make a hem/place for the string).

Then connect your dots. Don't worry if it's not perfect, it doesn't need to be.

STEP 4
Cut that sucker out

STEP 5
Fold over about 1/2 inch all the way around. At this point, you could either iron it (although now you've taken your ironing board apart so that would be a pain) OR you can do what I did and just sew it willy-nilly around. Again, it does NOT have to be perfect just try to keep your hem consistant all the way around.

STEP 6
Fold it over AGAIN this time about 1 1/2 inches and pin it down. Working around the corners will be tricky but don't worry about it looking pretty because this will be on the underneath side of your board so it doesn't matter. Stitch around the whole thing. Make sure to a space open to get your string in there after you've sewn it up! I left a corner open but it looks slightly sloppy. I would suggest leaving a spot open along the long edge.


STEP 7
Use the ever-handy safety pin attatched to yarn/string/whatever you've got laying around to thread it through your new open hem.

Now that you've got it all ready, put your batting piece on your board, cover it with your new cover and pull the strings tightly so it's hugging your board. Tie it tight and admire your handywork!

There you go, that's it. Takes practically no time at all and you've given new life to something! bravo!


Saturday, March 19, 2011

Rabbit Food

When my parents came to visit, I bought a giant bag of baby carrots because my dad's on a diet and I wanted to have healthy snacks available. Well, I still had a lot left and I really don't like wasting food so I searched for a recipe to cook 'em up into a side dish. Found one by Rachael Ray on foodnetwork.com . Turned out delicious! Sweet and buttery is a good combination!

Friday, March 18, 2011

Happy St. Patty's Day!

Ok, yes, Im a day late but whatever. I'm Irish all year round so every day is St. Patty's Day to me! I hope you all enjoy the weekend and drink up! Make us Irish folk proud!

(note-to-self: Yuengling does make make very green beer. BUT, it's still delicious!)

Thursday, March 17, 2011

Special Surprise!

My Grandma always has always had Drake's Devil Dogs in the house ever since I was little. They are amazing and you can only get them up north (as far as I'm aware) so they were always a treat when I was in NY visiting. This novelty has not been lost on me as I have grown up. I was recently visiting my Grandma on Long Island and couldn't keep  my mitts off of the things. They are so yummy.
So, today I receive a package in the mail from my Grandma. This is completely unprecedented. I'm used to getting holiday cards from her but I can't remember a time when I ever got a package so I was confused... until I opened it and found SEVEN boxes of Devil Dogs. It was hilarious and awesome and I immediately began eating them. Uriah had never had one before and although he still thinks that Ho Hos are better (blasphemy), he likes them and I think we'll plow through the 7 boxes faster than we probably should.
What was really cute was that my Grandma was so tickled to have sent them to me. It was adorable and she was so pleased with herself for thinking about it and following through. I'm happy to recieve large boxes full of goodies and I'm wishing that I had more self-control.

Thursday, March 3, 2011

A Little Southern Comfort

I made a new thing today! And it's not an apron, it's FOOD! Yummmmy. I got my new Simple and Delicious magazine (a part of Taste of Home) in the mail a few days ago and I spotted a recipe that looked well, simple AND delicious! Also, I had most of what I needed to make it in my posession already so, I knew that I would be making it some time soon. That time was today, my friends, today.

'What is this magical recipe?' you may ask. Well, dear friends, it's a good ol' southern staple (that I have never had coming from a yankee family), Chicken 'n Dumplin's! You have to say it like that or else it's not authentic.

SO, this was what I like to consider a "semi-home-made recipe" (hello Sandra Lee). It involves using staples from your pantry like, biscuit mix and cream of chicken soup. I didn't have cream of chicken so I used cream of mushroom but, as I told my husband earlier, I consider most of those soups to be completely interchangable. Turned out delicious! Take a gander!


Make it for yourself!
What you need:
1 1/2 cups milk
1 1/2 cups frozen mixed veggies (thawed). I suppose you could use fresh ones if you're feeling fancy
2 1/2 cups cubed cooked chicken
1 can condensed cream of chicken soup undiluted (again, I used cream of mushroom)
1/2 tsp. garlic powder
1/4 tsp. poultry seasoning (I didn't have this so I just sprinkled in my own mix of seasonings and then some extra pepper because I like pepper)

Dumplings:
1 cup biscuit/baking mix (bisquick, people!)
1/3 cup French-fried onions, coarsley chopped (to avoid walking around the store forever like I did, these are kept by the canned green beans)
7 Tbsp. milk
1/2 tsp. dried parsley flakes

In a Dutch oven (don't have one, used a large non-stick pot), combine the first 6 ingredients; bring to a boil, stirring occasionally

Meanwhile, in a small bowl, combine the biscuit mix, onions, parsley and milk until just moistened. Drop by heaping teaspoons full into simmering stew. Cook, uncovered for 10 minutes.

Cover and simmer for 10-12 minutes longer or until a toothpick inserted in a dumpling comes out clean (Do not lift the cover while simmering - duh).

That's all! Spoon into very large bowls (trust me, you'll want a lot) and enjoy!